Seamless Floors – 8+ Refinishing system for marble and travertine tile floors
Natural stone tile floor is not only a premium look and great value to your home, but a quality durable floor that can last for many years or even decades. Unfortunately, with time, because of heavy traffic, and in some cases structural shifts, natural stone can get really worn or damaged.
Of course, the fastest solution in case of severe damage is to replace tiles with new floors, but we know how costly that is. The smartest and most budget friendly solution is restoration.
We offer the type of solution that would target many issues at once. We call it 8+ Refinishing System. The reason for the name is because there are 8 steps in this process and sometimes may be few extra depending on the floor issues (hence the “+”)
The goals of this type of restoration are to remove lippage from uneven tiles, change grout to epoxy like material to create a seamless floor, remove scratches, etch marks, stains, dullness, repair cracks and fill all travertine holes and create a smooth seamless travertine or marble tile floor with a desired polished or honed finish.

1st step. We cut the old grout and thoroughly clean tile joints to prepare for filling.
2nd step. We color match epoxy filler with your existing stone, mix it with the hardener and fill tile joints with it promptly.
3rd step. We begin the grinding process by deep cutting with heavy duty metal pads in order to remove tile lippage and even the tiles.
4th step. Floor machines can’t cover all the corners and edges. So, we work on edges with hand-held machines.
5th step. This is a step for travertine tiles only. After heavy grinding travertine tile exposes naturally occurring holes which need to be filled. For filling travertine holes, we use a special grouting floor machine to help achieve even filling.
6th step. We continue honing tile floor, and we gradually increase diamond pad grit levels to smoothen the surface.
7th step. For polishing we use a 3-step D.I.P. System (Diamond Impregnated Pads) to reach desired sheen.
8th step. The last step of our 8+ refinishing system is floor sealing.
+ steps/extra steps can include any crack repairs, broken tile replacements, different stone inserts which need separate restoration process (example travertine tile floor has small decorative marble inserts)
A huge benefit of this seamless floor system is easy maintenance. Epoxy grouting won’t change color and since seams are leveled with tiles, they don’t accumulate any dirt and the floor is just a bliss to clean.
8+ Refinishing System Project Videos/Case Studies
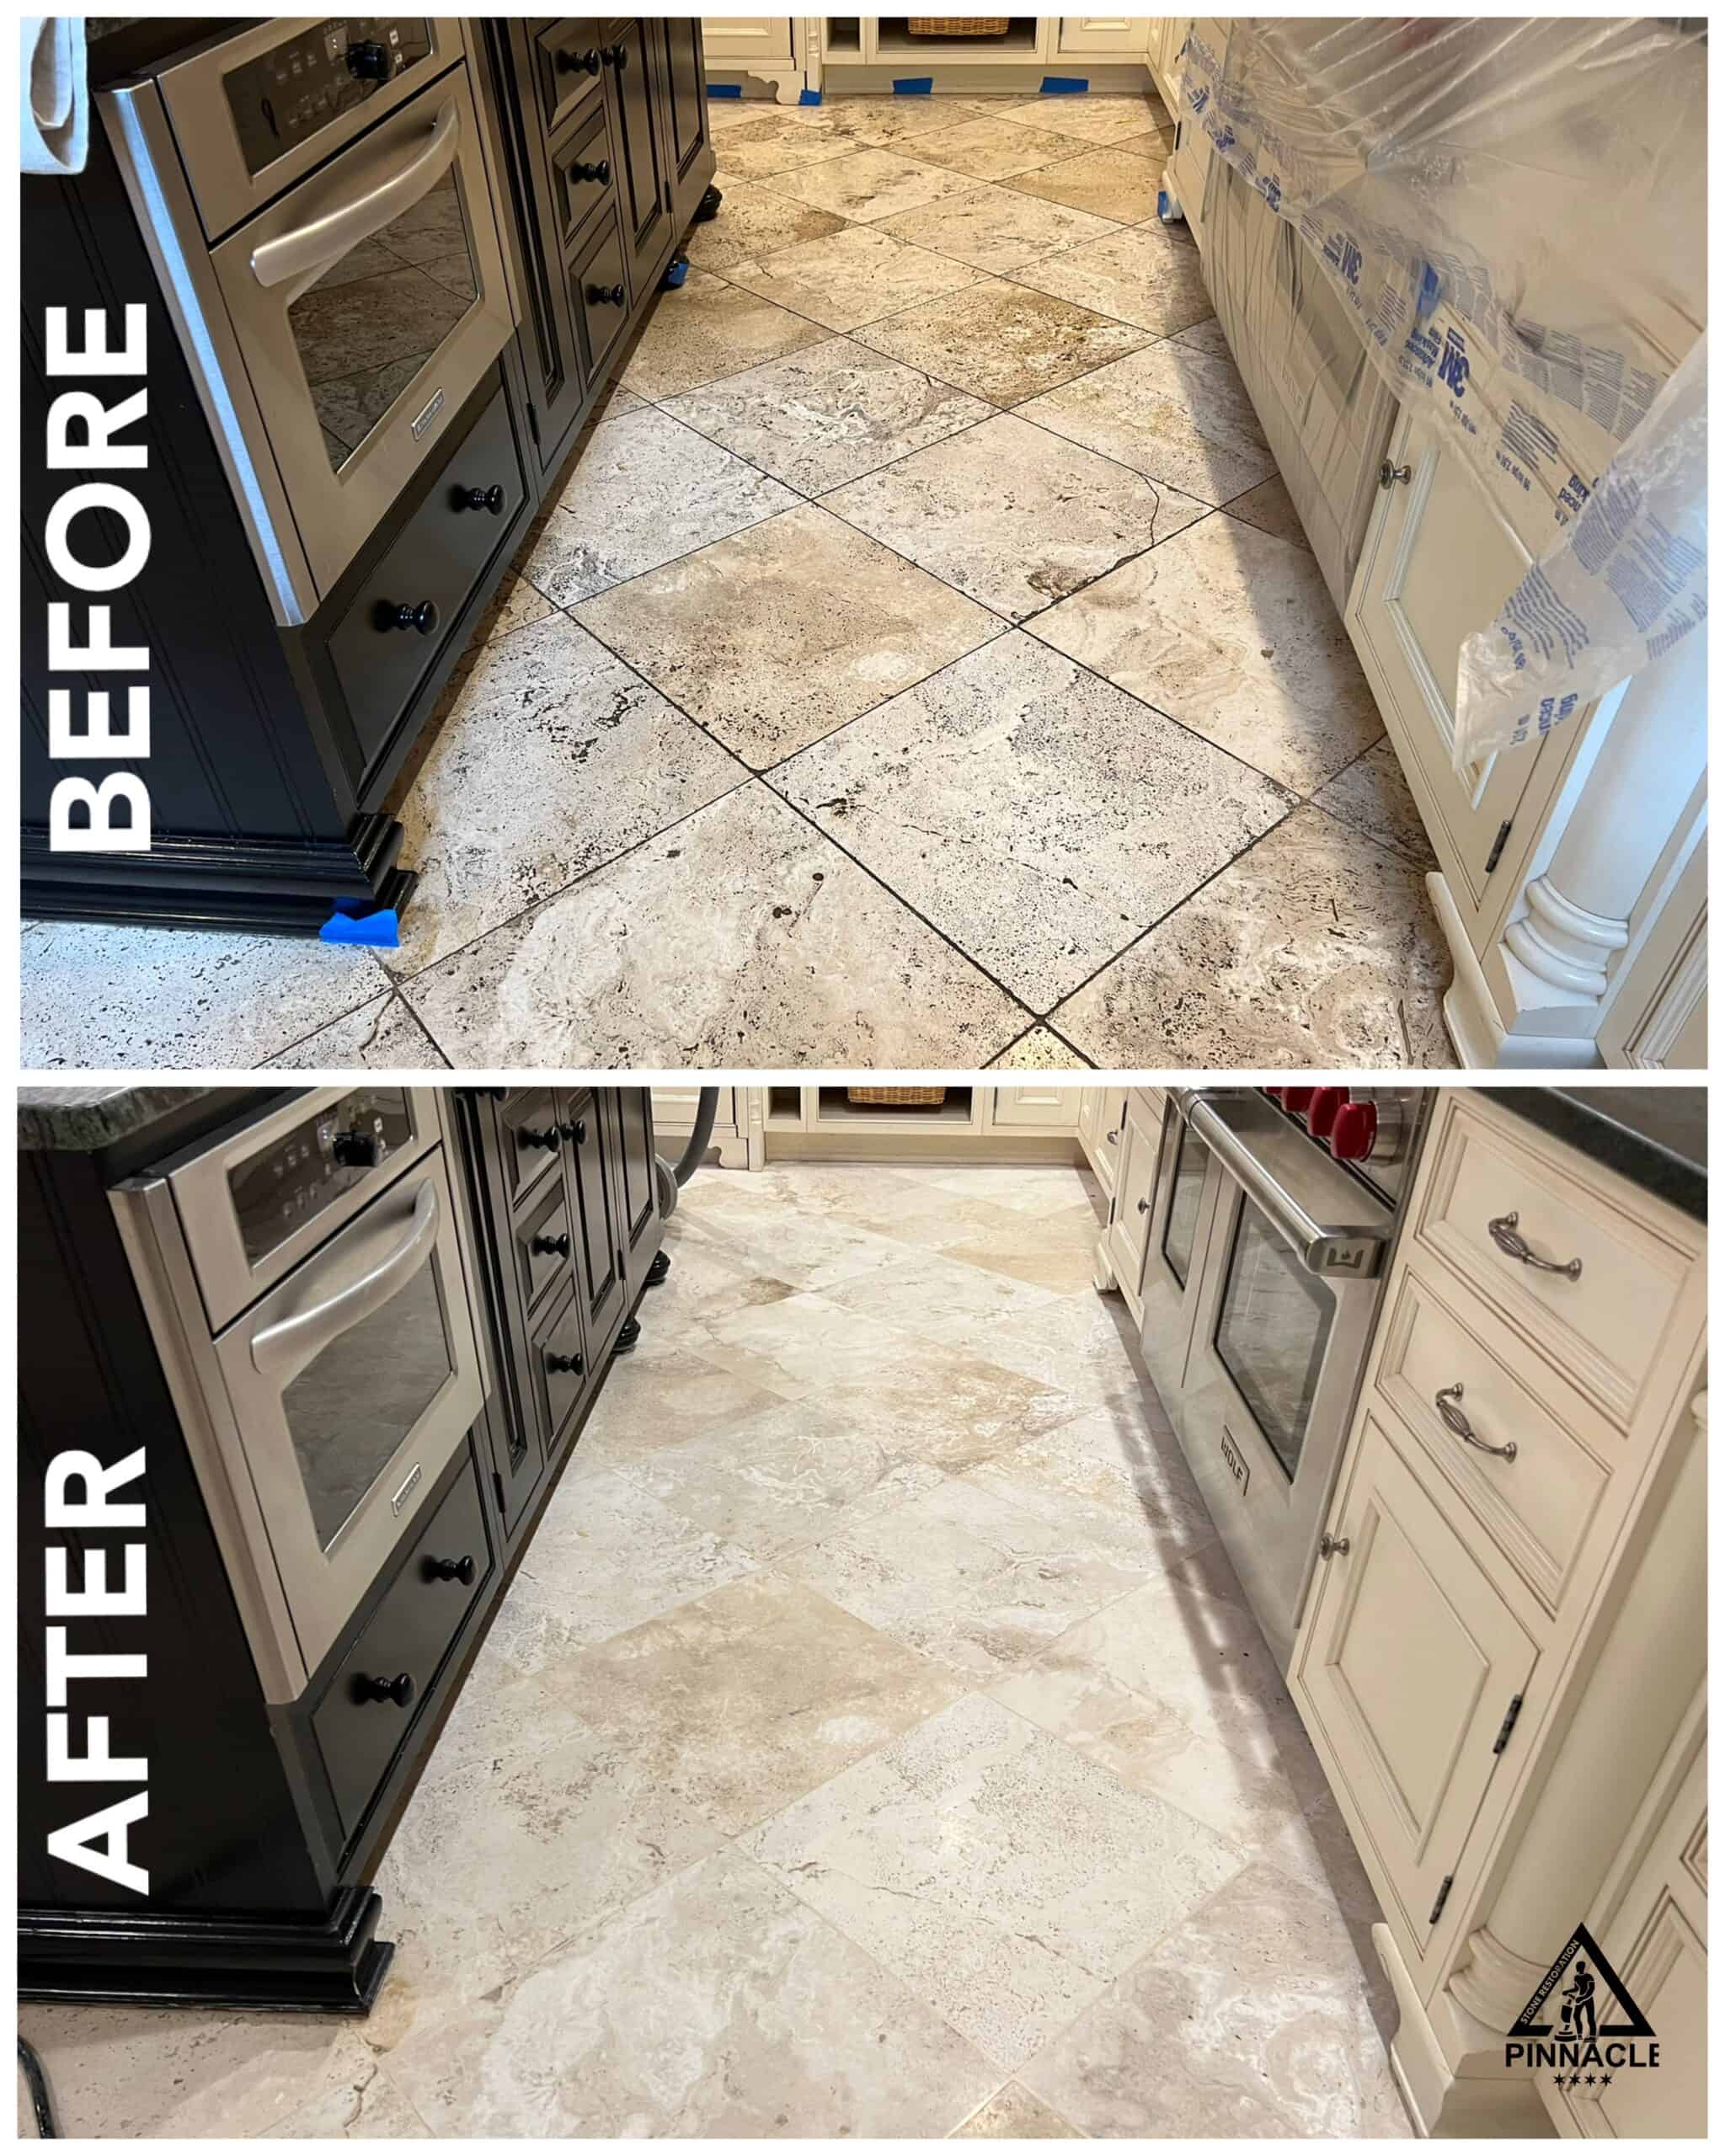
In this case study travertine floors have multiple issues such as severe tile lippage, dullness, scratches, extensive wear and tear, stains, cracks and holes, and damaged dirty cement-based grout.
OLD GROUT REMOVAL (AS DUSTLESS AS POSSIBLE)
The first step of our 8+ refinishing systems AKA seamless floor system project is GROUT REMOVAL. Our highly experienced technicians use proper tools to ensure this step is accurately executed and that we make it as dustless process as possible. To ensure maximally dustless operation we use a special dust collector unit placed in the working area. We also use several sets of vacuum systems to collect dust produced by grout removal process.
EPOXY FILLING INTO EMPTY TILE JOINTS
Next step is EPOXY FILLING. First, we prepare the epoxy filler. We color match epoxy with the travertine floor to be filled into the already emptied tile joints. Then we mix it with hardener to be applied right away. We can only mix a limited amount of filler at a time because of its hardening feature. Each technician makes frequent small batches of epoxy filler because the project has a very substantial square footage.
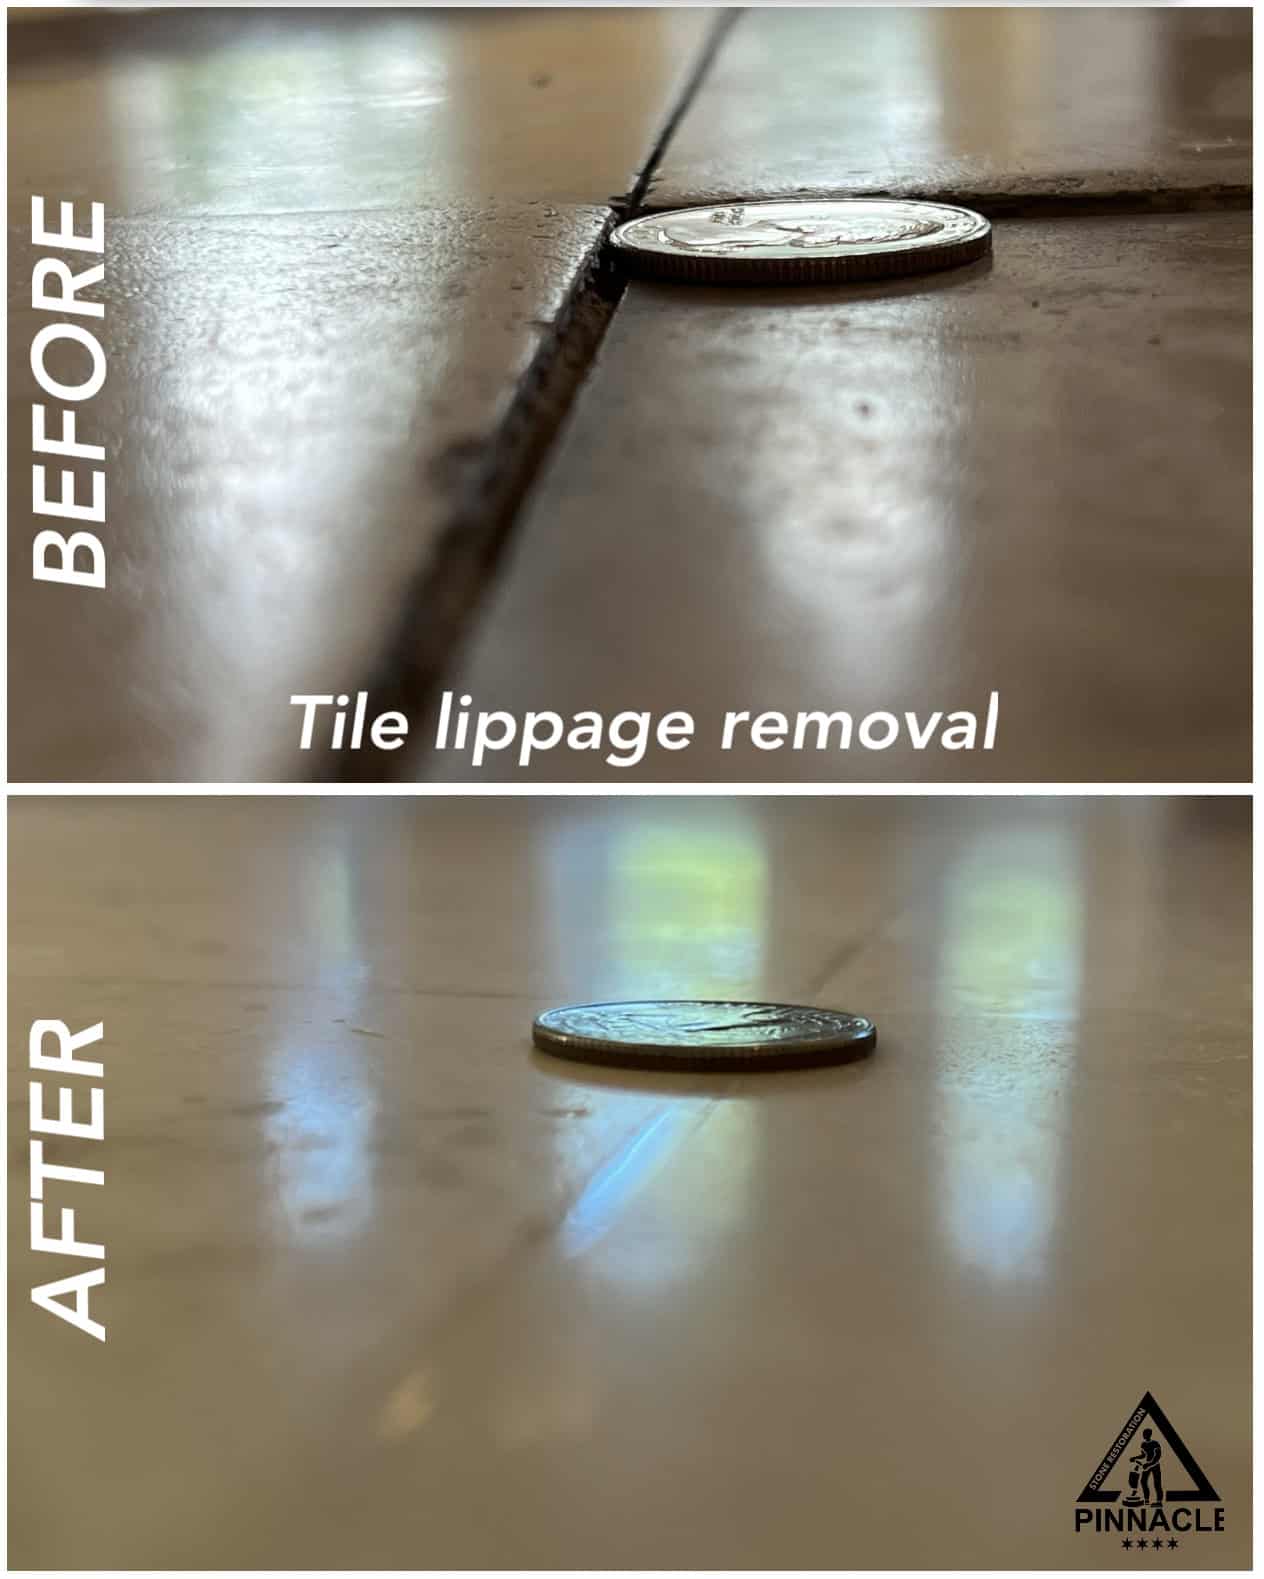
LIPPAGE REMOVAL – FLOOR GRINDING PROCESS
Next comes LIPPAGE REMOVAL, which is an important step for achieving seamless floor result. Lipping was caused when two or more travertine tiles in this floor were joined together and slightly misaligned or twisted which caused one or more edge of multiple tiles to be higher or lower than the adjoining tiles. It is a heavy-duty process which requires proper equipment, strong and experienced stone experts, and precise calculations. We begin the floor grinding process. After first test we notice the machine does not cut the desired amount of stone. We attach special weights on top of the machine to increase tool pressure points to make sure we cut the necessary amount of stone in order to level the travertine tiles. The wet grinding of the stone surface is the best way to ensure the dustless process of natural stone. Our grinding machines have a special apron installed around grinding head to prevent slurry from splashing all over. The second machine with the next level grinding pads is following the footsteps of the first grinding machine that has the deepest cut metal pads. This is to ensure the timeliness of the project and meet our deadlines. Notice how much slurry is produced. This indicates how deep we are grinding the stone in order to level the tiles. We quickly pick up the formed slurry by wet vacuum systems. When enough is picked up we mix the large amount of stone slurry with the quick gel to ensure proper environmentally friendly waste system. All the travertine tile lippage has been removed in order to achieve solid seamless floor.
GROUTING PROCESS
In this next step of our 8+ refinishing AKA seamless floor system project is
GROUTING.
After coerce grinding process the travertine is left with multiple exposed holes. Those holes are a part of stone’s natural structure. We apply color matched grout all over the travertine floors to ensure the maximally possible number of holes to be filled with travel. Our technicians use different trowels well designed to press grout into those exposed holes. We give the grout a day and a half to get fully cured. Then we come back to grind the floor to remove grout excess.
HONING PROCESS
We start the HONING process. We work on edges by hand to ensure we reach all the narrow spaces that floor machines could not cover. As the last part of honing process, we use DIP (diamond impregnated pads) system for fine honing process. D.I.P. System (Diamond Impregnated Pads) We use diamond impregnated pads for fine honing as one of the last steps. The pads we use are made with billions of microscopic diamonds. They help us bring travertine floor to a desired slightly sheen matte finish.
MARBLE INSERTS POLISHING This particular project has an extra step for us. The foyer travertine floor has marble inserts which our client asked to make shiny to stand out. Since the travertine tiles are honed, we need to carefully polish those marble inserts without disturbing already honed travertine. We mask travertine tiles around marble inserts with the masking tape. We polish the inserts by hand and then remove the masking tape. The shiny marble inserts really stand out among honed travertine tiles and give the foyer a special charm.
FLOOR SEALING PROCESS
The last step of our 8+ refinishing systems AKA seamless travertine floor project is SEALING. We do not use a traditional way of sealing with the microfiber pads. We apply sealer to travertine floors using floor machines. It is a more European style of stone sealing and it has been proven to be highly effective.
8+ Refinishing System and repair of travertine tile floor. We restored and repaired this severely damaged tile floor. We removed a significant amount of lippage and created a seamless floor with our 8+Refinishing System.
8+ texturing system of quartzite floor. In this successful project we have installed new epoxy grout, removed lippage, refinished quartzite with diamond brushes and made a gorgeous looking textured finish that is called brushed, leather, antique finish. Grout removal took us a whole day since the area to cover was really large. We used D.I.P. System for Polishing, and sealed the floor as the last step.
We deliver fantastic results and complete makeover of your travertine or marble tile floors with our 8+ Refinishing System aka Seamless Floors.
This customer desired a seamless floor look with honed finish of travertine floor.
ISSUES:
• OLD BROKEN GROUT
• MISSING GROUT
• WEAR AND TEAR
• ETCH MARKS
• SCRATCHES
• LIPPAGE
• CRACKS
• STAINS
Our 8+refinishing system was the right fit for this project and results delivered exceeded customer’s expectations.
8+ refinishing system of marble tile floor AKA Seamless Floors – grout removal, lippage removal, epoxy filling, holes filling, polishing, sealing.
The goal of this project is to remove lippage from uneven tile throughout all the surface, change grout to epoxy like material, fill all travertine holes and create a smooth seamless travertine tile floor with a light sheen. 8+ refinishing system is the perfect solution to cover all requirements of this project.
This floor was on a brink of demolition and brand-new floor installation, which would cost our customer an enormous amount of money. We helped our customer to save lots of money by refinishing and restoring this severely damaged floor with our 8+ refinishing system.
The following issues needed solution:
• Cracks
• Holes
• Stains
• Scratches
• Broken tiles
• Discoloration
• Significant wear and tear
• Severe tile lippage
• Old dirty grout
• Wrong filling material on some tiles that needed leveling
8+ refinishing system of marble tile floor – seamless floors, new epoxy grout and polished marble
8+ refinishing system of marble tile floor from polished to leather finish. We cut grout. Fill joints with epoxy grout. Then we remove tile lippage and grind floor till it’s leveled. We repair all the cracks in the floor. We use special brushes to create natural leather finish. We polish with D.I.P. system and then seal marble tile floor. The results are exceeding expectations.